
- Highlights of the Winter Garden -
Hellebores are one of the delights of the cold winter months. Hellebores are perennials, mainly native to woodland edges, so they thrive in dappled shade, although some will also grow in sun and others prefer the comfort of deeper shade. Many varieties have bold evergreen leaves, some are marbled or silvery which gives them an added charm. These pretty plants bloom in winter and into early spring, when little else is about, so why not add some cheer to your garden during the long winter months. You can find our range of Hellebores here. Be quick though as some of our varieties take a while to bulk up so we do not have huge numbers of them/
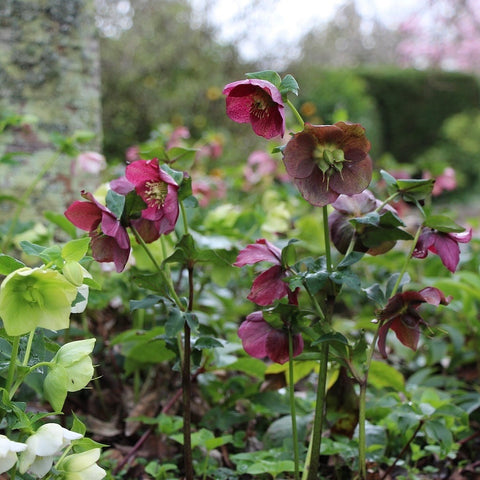
The delightful shade range of Hellebores

The choices are now wide and varied and of course there is the orientalis variety which delights with its little seedlings throwing up all sorts of different offspring.

P L A N T I N G H E L L E B O R E S
Hellebores are best planted from autumn right through to spring so that they can establish before the ground starts to dry out. They also make great specimens for pots and I have a lovely variegated variety which I have underplants with bulbs.
Choose a full shade or partially shaded area in your garden border or do as we have done and use them for underplanting deciduous trees as they make an excellent ground cover. The delicate markings of these pretty flowers are best appreciated from underneath their hanging flowers, and the reason that these flowers in fact droop their pretty heads is so that they protect their delicate flowers from the elements. This also helps to protect the pollen on the stamens for the bees and other pollinators that brave the winter weather looking for food - nature is very clever don't you think!
Hellebores will perform to their best in a moist but well drained soil. They also appreciate soils that are rich in leaf mould or organic matter, we mulch to help with moisture retention. Be sure though to plant them somewhere where you will see them over the winter months to be able to appreciate them rather than somewhere tucked away in a corner of the garden that you don't visit in winter.
Make sure you cut away all dead and dying leaves and then add some manure or fertilise in about June to early July. If of course you only want to admire your flowers in the garden rather than picking them, be sure to deadhead once flowering has finished as aphids are attracted to the seed pods!
P I C K I N G H E L L E B O R E S F O R T H E V A S E
Floating your hellebore flowers is a wonderful way to show off their pretty little faces as most varieties do tend to hang their heads when in flower. We will talk a little bit more about picking hellebores and how you can get some longevity out of them so do read on, as some varieties are better than others. All varieties though are adored by our bumble bees, who seems to come out of hibernation the whiff of the first Hellebores in flower, hungry for their nectar rich flowers.

A R R A N G I N G H E L L E B O R E S
There is something about the delightful, delicate cupped flowers that sit above the strong large often tooth leaved dark green foliage of Hellebores - the colours are stunning ranging from the purest and most delicate of white through to lime green, peach, plum lemon and picotee (lighter background with darker edges )as well as many with ruffled collars - the variety is wonderful.
This stunning white variety has a ruffled collar

Hellebores look beautiful in just a little glass bud vase as well as adding elegance to floral work. The way that their flower heads droop does worry some people whilst other florists thrill at the ability to be able to use them on the edges of their floral work to created a perfectly considered design.
That said, Hellebores can in fact be a bit tricky and challenging to work with as they often wilt prematurely, so we wanted to provide you with a few tips and tricks that we ourselves have tried and some that we have been made aware that seem to work really well, that will help you to get that little bit of longevity from these delicious flowers.
C O N D I T I O N I N G H E L L E B O R E S
T H A T H A V E J U S T F L O W E R E D
When you are gathering flowers that have just opened, we find the best way to treat them is to firstly strip the leaves from the stems as leaving the leaves on will only keep moisture from reaching the flowers. We use our ARS SE45 snips and make sure they are really sharp. Score a slit up the side of the stem from the base up to just below the flower head. Once you have done this, plunge your stems into a clean container filled with cool water and leave your flowers for twenty four hours. Make sure the flowers are covered in water up to the base of the flower heads so that the cut stems are fully under water.
C O N D I T I O N I N G H E L L E B O R E S
T H A T A R E A B I T O L D E R
When flowers are at the next stage which is when they have dropped all of their stamens but still look very pretty you can use the searing method which is when should cut the flowers from the plants and cut the stems and then place them into boiling water for about twenty seconds, and then remove them and hold them over a flame until you see the ends blacken. Once you have done this pop them into a bucket of cool water for a few hours and then you will be able to incorporate them into your arrangement.
The Hellebore on the left has been pollinated and you can see the seed pods developing. The Hellebore on the right has not yet been pollinated - all of the stamens are still in place.

C O N D I T I O N I N G H E L L E B O R E S
T H A T H A V E D E V E L O P E D S E E D P O D S
Even when the flowers are older and are more mature their flower heads still look very pretty and can definitely still be used. Essentially this is when the flowers have been fertilised by the bees, dropped their stamens and the ripe chubby seed pods are starting to develop. When the flowers are at this stage, do as you did with the new flowers stage and remove the leaves totally and then cut the stem at an angle the more the surface area is exposed, the better the water absorption will be. Leave these in cool water for a few hours or overnight if you want to before using.
Waiting for the for the flowers to be fertilised by the bees is actually your best bet as even with the best conditioning tips how they will actually hold cannot be certain as some times these tips work better than others! In addition to this once the seed pod is actually starting to form this is what will give your flowers more lasting ability - the bigger the seed pod is the longer they will last, so younger flowers whilst stunning may not give you the longevity that you crave.
Others say that you in fact need at least one fertilised stem on your hellebore for the whole stem to last well, so in other words a combination of flowers at different stages can also be beneficial to longevity.
The thicker the stems means that they will have move lignin in their cell walls and this is essentially something that will strengthen the stems and also normally provide you with a longer vase life. It is often so difficult to know exactly when to pick, particularly when you have masses of them all at different stages, but we hope that these little tips and tricks that we have read about and tried along the way will help you have a little more faith in the ability of these very pretty flowers to last better for you indoor floral work.
P R O P A G A T I N G H E L L E B O R E S
Hellebores will seed themselves about quite readily, and this means that their offspring could be hybrids of surrounding parents, which can lead to some exciting discoveries - if you do not want these new seedlings then you will have to ensure that you cut off their seed heads which you can save the seed from if you do you do want to propagate from your plants this way.
A safer way of propagating new plants to ensure they come true to the parent plant is to divide them. Find a good established clump, which ideally should be at least four to five years old that is just about to finish flowering, and that way you have a good chance of identifying which cultivar it is if you have not put a plant label in. Lift out the whole root ball and split into two sections apart. Replant in freshly composted soil and water in well, its as simple as that!

We hope you have found this Garden Journal helpful. Enjoy the Hellebores in your garden and we hope that you have success in trialling the different ways to help your Hellebore flowers last longer. Let us know if you have any tips that work for you as we are always keen to try new ways of conditioning our flowers.
Leave a comment